Friday, December 22, 2017

Shore Power For My FWC Fleet


I need to first paint a picture of what my camper shell had for power.  It only had a AGM battery tied to the previous owners truck’s charging system through a charging isolator that FWC uses.  There will be more on this in another post, but I did not have that charging circuit on my Tacoma.

The reason I bring this up was that the camper came to my house and came off my truck and sat in my garage for its conversion into my camper.

This meant I wanted to use the campers ceiling lights but had no good way to charge the AGM battery.  There was also no shore power for running tools or charging things.

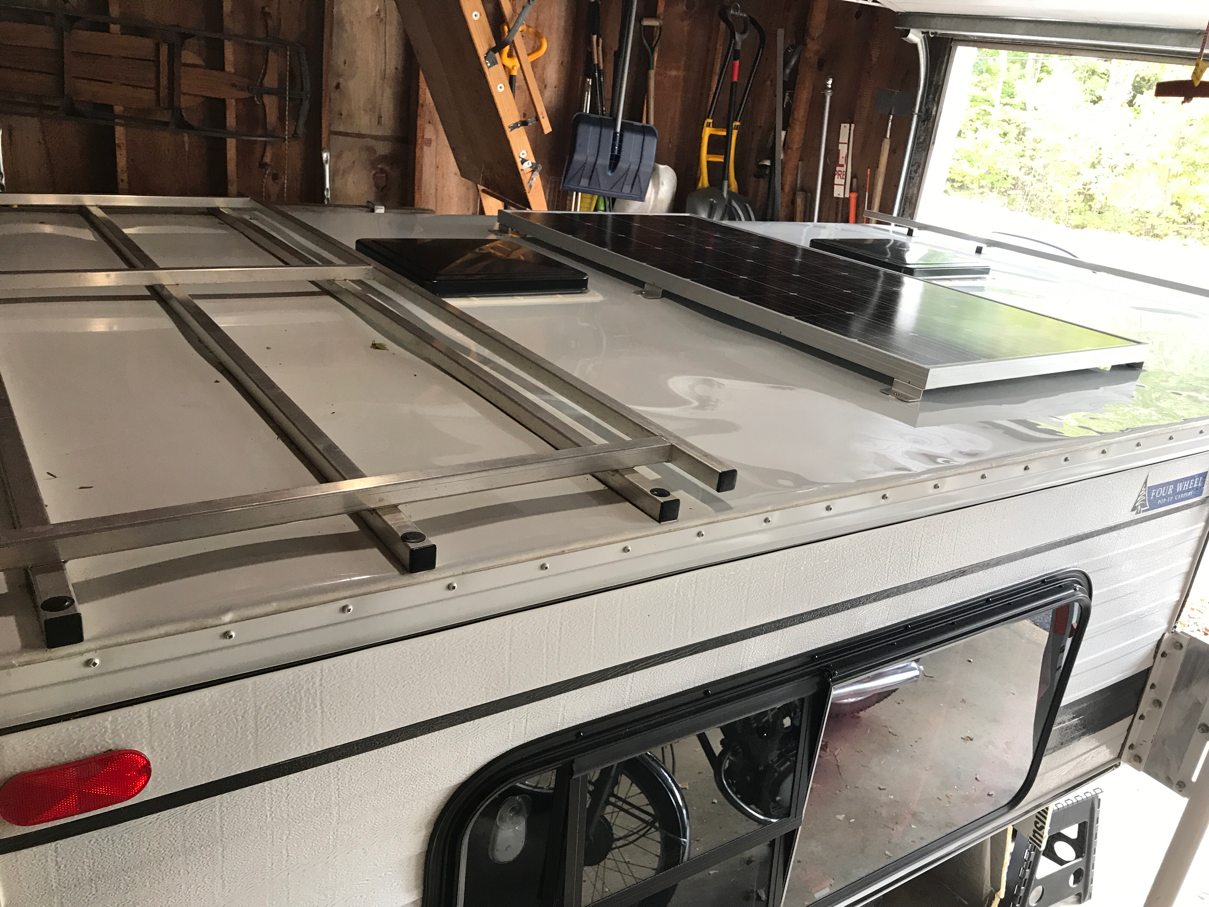
Before I installed the solar charge controller for the solar panel, I mounted in the previous post, I needed shore power.  I had a goal to install the items that FWC would use for shore power, so it was time for an email to FWC.  I wanted to know where to put the hole in the outside of the camper to mount the recepticle they supplied me.

They had no guidance other than to tell me to rip open the wall by removing the inside paneling.


The task of finding the location for the power recepticle involved removing the cabinet system First and then wall covering to expose the wall supports.

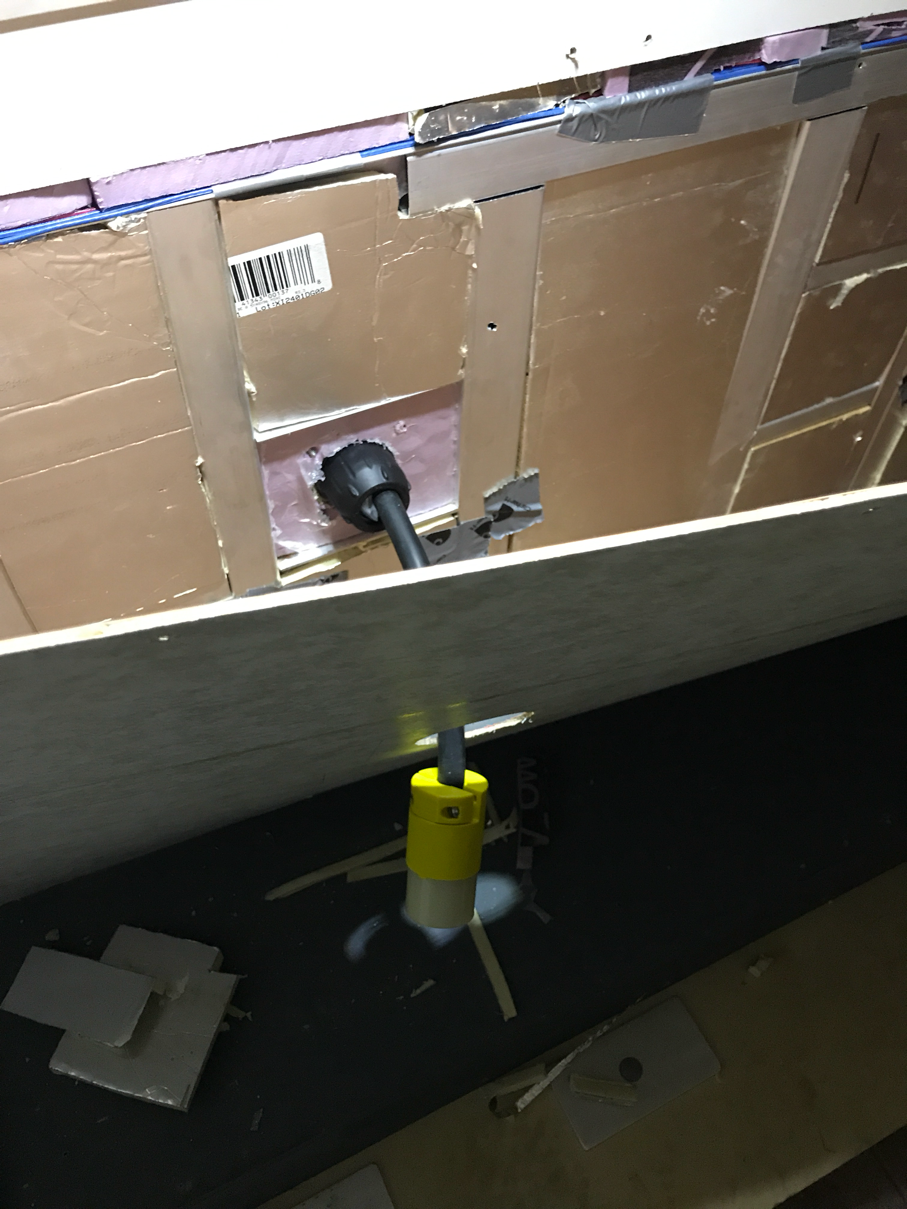
What I found was the mounting location of the receptacle, but also missing and limited insulation.  My above picture was after the recepticle was installed and 1/2” foil insulation that I added to fill voids.

I applied twist lock power cord ends to make wiring to the camper easier.


Above shows the power cord coming in and cabinet to be put back in place.


After getting the cabinet back where it belongs I added a few circuits.

To the left the two cigarette outlets were tied to the original AGM battery and stay that way for now.  It was used to power the fridge of the previous owners.  I will review later.

To the right of it is a proprietary outlet for the Engel compressor fridge.  This allows the removal of the cigarette plug and screw in the Engel cord for a better connection that will not vibrate out.

Next is a dedicated 12 volt cigarette outlet for my RoadPro hot water pot or my 12 volt rice cooker.

Lastly, I wired in a 120 volt shore outlets.


Inside the cabinet where the 30 amp shore power comes in I put in a circuit breaker box.

Here I am wiring a quad outlet box for 2 duplex outlets to power items inside the cabinet.  This will include powering the 120 volt LiFePo4 10 amp charger from my Prius.  Another breaker powers the outlet on the outside of the cabinet wall in the previous picture.


I would charge the AGM battery all summer with the the multi-chemistry lead acid battery charger I had from my first two years of Prius travels until I converted the AGM circuit over to LiFePo4.

The above allowed me to work on the camper all summer and into early winter by not only running tools but also running an electric heater when it got cold.

A lot more 12 volt circuits will be added which I will cover in later posts.

Brent

macaloney@hotmail.com


Tuesday, December 19, 2017

Mounting & WiringThe Solar Panel


Above is the solar panel I decided on getting for my FWC camper and the price was right for about one dollar per watt and no shipping or sales tax.


Next I needed to find the location of the wires that FWC left in the ceiling of the camper for future solar install.  It took a bit to find the wiring box.  Then I needed to decide on the connection I would use to connect the panel.  After talking to FWC I decided on the SAE connector they use when they do the install.

After screwing the SAE connector to the roof location I used Marine adheasive as recommended toseal the mounting.


The solar panel came with MC4 connectors and because I chose to use SAE connector through the roof I needed to change the wiring on the solar panel.


Above I changed over the wiring to the SAE connection after contacting FWC about getting a right angle adapter.  They sold me the right angled connector to hook into the ceiling solar wires they installed at the factory. Note that a straight connector/cable would’ve too tall to put panel over connector. 

Having the panel over the connector protects the cable and connection.


The location I chose for the panel was over the roof connection allowing for a short wire connection.  Above you can see the connector mounted under the panel.


Next I needed to decide on the method of mounting the solar panel to the roof supports.  I found this installation guide online and decided this was the best approach.


I needed to buy the “Z” stand-off brackets.  The first brackets I bought were 2” high stand-off.  I didn’t like the height so I found ones closer to one inch high.  This sets the top of the solar panel close to the top of the roof vents, and a much cleaner roof.

Since my roof supports are only 1” tall and had two offset holes, I redrilled the new shorter brackets with a center hole for mounting one bolt in each panel to the bracket and one hole in the roof for each bracket. Note the roof supports are perpendicular to the length of the panel.

Also predrilled holes on the back of panel did not align to where I needed them so I had to drill all new holes in the panel for the “Z” brackets.


You can see I decided to put 3 brackets on each side for a secure mount.  I did find the recommendation of 6 brackets if solar panel is over 150 watts. You can also see the predrilled holes in the panel I could not use.


Lastly I needed to decide on screwing directly through roof supports and use sheet metal screws or use expansion nuts and bolts.

I decided on expansion nuts and bolts.  I marked the hole locations I neeed to drill on the grid I marked in the roof. 

I drilled a 1/8” hole and used a wire to feel if I was centered in the roof support aluminum tubing.  Then using this information I then enlarged the hole to accept the expansion nut that uses a 10-32 bolt

I chose to buy 10-32 stainless steel hex head bolts as Phillips screw heads could strip on or off if needed.


I did use Marine adheasive to seal under and around expansion nuts.


With the solar panel installed and wired to factory wiring, now I need to wire the panel to asolar charge controller and circuits.

More to come in another blog about the solar install.

Brent

macaloney@hotmail.com

Thursday, December 14, 2017

Solar - Maximum Wattage To Get / Picking The Location


Wattage relates to size of solar panel and size relates to placement.

At this point I have my 30 Ah LiFePo4 I used in my Prius for a house battery, and I know it will handle my Engel compressor fridge needs, so that is the information I will use for sizing the wattage.  Actually the manufacturer’s output amp rating of the solar panel needs to be 10 amps or less, as this is the max that my Bioenno LiFePo4 can take.

I know 10 amps works as I charged my battery from my Prius 12 volt circuit, through a 400 watt inverter, to a 120 volt LiFePo4 specific 10 amp charger.  I also knew my Engel only uses 12 amps a day, which means I should be good with a 150 watt solar panel.

My searching for a panel actually resulted in the purchase of a  170 watt panel that puts out just under 10 amps. I will discuss my solar panel selection in another post.

Actually, I did have another issue not covered in my prior post.  My Four Wheel Camper (FWC) is a pop up camper and I have to be mindful of increasing the weight, as the current center lifting struts need to handle the increased weight. This too will be another post on how I decided to handle the increased weight.

On to the next issue of finding a location for the solar panel on the roof.


I had seriously considered putting the solar panel on the roof rack at the back of the camper.  I called FWC and they said I could but suggested keeping it lower and that I may want to actually use the rack in the future.


Why was I apprehensive about the roof mounting.

Two reasons.  

1. I didn’t want to put extra holes in the roof that may leak in the future.

2. The roof rafters are aluminum square tubing and I didn’t want to miss drilling into the tubing vs just the thin aluminum roofing.

I overcame my reluctance by laying out where the tubing is from holes made in factory in the roof.  I drew with erasable white-board markers from point to point and using inside measurements where I knew beams were and measuring over from the holes on the roof to find the rest of the beams.

It took hours to do the roof layout, but it paid off.

I will cover my mounting of the panel and getting the wires from the panel inside the camper in my next post.

Thanks for following.

Brent

macaloney@hotmail.com


Sunday, December 3, 2017

Adding Solar To My Four Wheel Camper


One of the biggest things I loose moving from a Prius to a pick up camper is that driving a Prius is like driving a generator.  Although I used solar last year to keep from idling the Prius to charge my house battery, the cost effectiveness with the Tacoma isn’t there for any idling.

My Engel compressor fridge uses about 12 amp hours a day and I’m not going to idle a 6 cylinder for hours to charge the house battery this coming year.

You would think a guy that worked in electronics for most of his working career would know; how many watts, is my 30 amp hour LiFePo4 battery the right capacity, do I keep the AGM battery that came with the camper.  Well, you get the idea. So many questions needing to be answered before I can get started.

I had to calculate, measure, and contact vendors for answers before buying and installing.

This solar installation is no easy task without the knowledge and some practical experience of others.

As you can probably see this solar discussion is more than one blog post.

So let’s review the issues I faced.

1. Maximum wattage to get
2. Solar technology 
3. Solar company
4. Where to mount on camper roof
5. Mounting method and how many mounts
6. Wiring to/from solar panel
7. Charge controller & technology 
8. Do I connect solar battery to engine charging circuit.
9. Where do I carve out a home for the battery, charge controller, and wiring.
10. Do I make a provision for charging from my 60 watt folding solar panel.
11. What do I use from Prius and what do I buy new.

Can you believe this list and each one takes up time.

Please stay tuned while I break all these down in the hope that someday my detailed posts will help you when you decide to install solar.

Brent

macaloney@hotmail.com

Friday, December 1, 2017

Camper Project - Where To Start


In November 2013 in expectation of my retirement as Fire Chief, I found the above 1994 Chevrolet G30 Coachman Class B Campervan.  I was glad to have found this 1 Ton camper in good condition.  

It was mostly ready to go, and that was my goal as I decided to leave in January for 3.5 month solo tour.  I wanted to change my life by reinventing who I was.  

I didn’t know anything about Vandwelling, but this was a great purchase to get me going.

It had what I needed to get going, but I didn’t like; driving it in wind, 10 mpg, and needing to plug in (no solar).

What it do is set the expectation for what I wanted in the future (Prius).


The Prius and my 3 years of modifications provided me so much more over the Class B.  Yes the Prius had it all, including washing and bathroom facilities.

The biggest issue was that I had clearance problems for some places I wanted to go and explore.  The minimal space and clearance was easily overlooked by 50 mpg and stealth. 


With the camper being a shell my focus turned to what I needed to address to sleep, cook, store fresh and gray water, cook, and power the fridge.

Moving to a 18-20 mpg vehicle meant that I needed acost effective way of powering the fridge and small electronics 24x7.  The heavy lead acid house battery charged off the engine would get me 3 days of power before charging, but I wanted power independance, like I had with the Prius and lead acid is just too heavy for a lightweight camper/truck combination.

Therefore, my most important focus for upgrading the camper was to address power and solar demands.  

I also wanted to address sleeping in the camper without raising the roof.  I wanted to sleep without the roof raised so I could park in Walmart or truck stop for the night without looking like I’m camping.

My needs for the camper don’t end with just those two items.  My list will address so much more.

I will focus on all the changes in future posts and then as I travel I will evaluate how well my designs actually work out.  Oh there are changes I will address on the road too.

Brent

Monday, November 27, 2017

Camper - A Blank Slate


It was love at first sight.  I wanted a FWC Fleet Shell model and there it was.  Only 1.5 hours from my house in superb condition.  


Only 2 previous owners and 2011 model matches the age of my Tacoma.  Other people wanted to buy it but had no way to come get it in Massachusetts and cost to ship was too much.  When I went to look at it I brought cash for a deposit in case I liked it.  I know FWC campers don’t last on the market long.


Minimal things had been done to the camper.  A cabinet for storage.  A deep cycle battery for some lighting and power for Engel compressor fridge, that was bigger than mine.  The battery is only charged from the truck’s engine.


The Engel was not only a larger model, it had the locking base and the two zone extension to make it an even bigger fridge.

Under the fridge was a propane install that supplies propane to a Wave 3 heater


The roof has a roof rack and two Fantastic vents.  The vent over the bed (further in Picture) is powered.  The one over the rear (closer to us) is passive (no fan - just a vent).

The original owner bought the camper from the FWC dealer in Wisconsin.  He lived in TN and had it for the majority of the time.  It was housed when in TN which accounts for the great condition.


The guy I bought the camper from in MA didn’t have it long using it for trips to the beach on MA south shore area (photo above).  He was selling as it didn’t work out the way he and his wife wished.

I paid a fair price for the camperat $9500.

I also knew when I bought it that I had my work cut out for me to outfit it the way I wanted for my 2018 travels.  

My future posts will take you through changes / modifications I have made.  This sounds simple but it wasn’t.  There were many things to learn, design, buy, and build/install to get it ready for January 2018.

Not included in the above, I will also cover preparations I made to my Tacoma to get it ready for the trip.

The reason I wanted a shell model with a blank slate was because I had studied the FWC and found them too heavy when the factory built them out.  

My goal during my build is the same I had when building my Prius in to a Vandwelling vehicle.  I wanted to have the same abilities in the Prius as I did in my Class B.  Now the Campervan will undergo a transition to provide as many of the abilities I had in the Prius.  Of course there will be some limitations, but there is a need for a goal.

I put the camper in my garage while working on it.

Thanks for following.

Brent

macaloney@hotmail.com


Thursday, November 23, 2017

Planning For 2018 Travels


After 4 years of travels each winter, I decided to change my Vandwelling experience for 2018.

My first year of travels was in a 1994 Campervan.  I didn’t like the experience and knew the day I got back home in 2014 that I would sell it and buy a Prius.

I engineered my new to me Prius, and updated it to make it more functional and comfortable, each of my 3 years of travels. I bought it used with 8,000 miles and I now have 98,000 on it.  I totally love this vehicle and my Vandwelling experience in it during my 2015, 2016, and 2017 travels.

I am not getting rid of my Prius.  Those that have followed me know I have toyed with the idea of a light weight pop up camper for my Tacoma.  I even went to the Sacramento area to visit the Four Wheel Camper (FWC) factory and writ about it here.

Well, after a 2 week tour of Scotland and England in May, I came home and looked at Craigslist and there was a 2011 FWC Fleet camper, that was being sold in my state, made for a Tacoma.  It was a shell model and that meant that I could design my own environment for my 2018 travels.  It was like it was meant to be as FWC’s are rare on the east coast.  As you can see in the photo above I bought it and it’s been in my garage ever since while I engineer solutions based on my Prius travel experiences.  

There is a lot to catch you up on with reasoning for my decision to change up what I will travel in.  There are pros and cons.  The most obvious is that I loose MPG and I am no longer stealth.  To offset the loss of MPG and stealth, I gain too with the camper.  I plan to take you through all the pros and cons of my decision and take you through all my problems and engineering of solutions.

If my decision to make this change hasn’t caused you to cast me aside as a trader of Prius dwelling, you will get to follow me during my 2018 travels to places my Prius couldn’t go.

Like 2014 2018 will be an experiment with the camper and if I don’t like my change, my Prius awaits for me when I get home.

Those that have enjoyed my Prius designs should find my FWC designs equally as interesting.

For all my followers, just because I am switching doesn’t mean you can’t contact me and ask questions.  You will be surprised how my minimalist living in the Prius contributed to my design logic on the FWC.

I wanted to write a few more blog posts this summer but I’ve been very busy.  A family member had an accident.  I had a man week trip with my two wonderful sons ending with seeing the eclipse in ID on my birthday.  I took a family friend to New Orleans for a sightseeing trip.  Lastly, I just got back from a three week tour of China.

It’s now nose to the grindstone to get as much done on the camper by the end of December before I leave.  I know I will be still modifying when I’m in the road.

Thank you to all who contributed to 122,000+ blog views since I started my travels.  I hope to provide you all with a lot more starting in January.

Keep safe, and hope to see many at the RTR in January.

Brent

Monday, May 8, 2017

Keeping Bottles And Bladder Clean


I carry two of these Camelbak bottles (above) in my Prius for my travels.  One I usually have water in it and the other I often make herbal tea.  The color does hide the buildup from making my herbal tea, by just letting the tea to brew at car temperature.  The other is smoke gray and also not easy to see buildup inside.

I found this problem last year when I started making my own herbal tea, I noticed the nipple that you bite on the bottle to drink had black in it.  After a detailed investigation, I was making a face at what I was drinking though, and I went out and bought a straw brush shown below.  Once in awhile when I washed dishes I would disassemble the parts on the bottles and wash them.  The brush is long but did get into the nipple to clean by twisting it to get into the cracks inside.  Cleaning the bottle meant putting a wash cloth or sponge inside with soapy water and shaking the bottle.  Not the best results, but it was acceptable.

Note: the above bottles are the ones I use with the SteriPen to sterilize the water (see separate post).  They arte 750 ml size and the SteriPen only has two settings, 1 liter and 1/2 liter, so I set the SteriPen on 1 liter for sterilization.


I think I bought the straw brush (above) at Bed Bath and Beyond.


My 2 Liter CamelBak also needed cleaning, but since it was just water there was no grime. The straw brush worked well on the tube but the bag I just flushed out and shook with some soap in in the best I can.


This year, I again went to Bed Bath Beyond and I found a bottle cleaning kit with 3 brushes.  The long large brush worked great on the inside of the bottles and the CamelBak bladder bag. The short brush works great on the CamelBak bottle straws as they are short.  It also worked good, not great, on the nipples.  The nipples still require angling the brush tip into the inside cracks to get it clean.  The short handled circular brush works good in the inside of the cap on the CamelBak bottles and the threads on the bottle. 


The above are now items that I carry with me for cleaning my bottles and bladder bag.  The 3 bottle brushes fit in one of my cooking bags that fit under my sleeping area and the long straw brush gets slid under the plywood floor (void space) I built for the cooking bags to slide in on.

For small vehicle dwelling, like my Prius Campervan, these brushes have become important to me in keeping my drinking containers clean.

Brent

macaloney@hotmail.com


Sunday, May 7, 2017

Prius Vandwelling Water Purification


In the past I have been asked about how I purify water in my Prius 6 gallon freshwater tank, that sits in the rear passenger side wheel well.  Above is the picture of my water tank (blue label on it) with white box on top for my clothing storage. 

I was also asked if I put chlorine drops in my 6 gallon water tank from time to time to purify the water, and I said no.  I start each year off with a clean tank and fresh water.  I also drain it with syphon tube when I visit my son in San Diego and put fresh water in and then drain it again before refilling it.  After that, I just add water from purified sources as it needs it until I get home.

During my travels I carry a 1 gallon jug of water that I use as fresh water to drink.  I keep the one gallon jug to fill and then refill the 6 gallon tank.  The 6 gallon tank is primarily used for heating hot water for cooking and washing.  I boil the water before it goes in my 24 hour thermos.  Therefore it is purified by boiling. 

There are times when I run out of water in my gallon jug and then I get drinking water from the 6 gallon tank.  Although I don't think I would have a problem with drinking the water from the 6 gallon tank, I do purify the water I drink from it with a SteriPen using my Nalgene bottle.


I bought my SteriPen at REI and I bought the best one that costs about $100.00.  When I hike in New England I carry the SteriPen so I can replenish water on trails from streams.

My SteriPen came in handy this year for my backcountry hike to Havasu Falls.  I would use water from the Havasu Creek and purify it for our drinking water.  I would do a Nalgene bottle at a time and refill our CamelBak bladders.

At the Havasu Fall Campground there is a spring and although it is reported to be tested once a month I purified the water with the SteriPen for our drinking water.  Water for cooking was boiled and I did not use the SteriPen.


The SteriPen I have comes with a Velcro closure case, USB charging cable and SteriPen.


The SteriPen I have is rechargeable via USB and it was fully charged starting our hike into Havasu Falls.  I purified many bottles of water during our 3 day hike.  I would estimate about 6 gallons and I only used one bar on the battery indicator. 


The pen has a protective cover for the ultraviolet stem of the unit.  The UV light kills 99.9% of bacteria. 


There are two settings on the SteriPen.  The on button pushed once will give you a countdown for 1 liter purification and pushing the on button twice is for a 1/2 liter.


The display shows the setting of 1 liter and the battery strength of 4 bars, meaning full battery.


For purifying a 1/2 liter the screen changes.


Above the clear tube (UV Pen) are two metal prongs. These must be kept in contact with the water at all times of purification.


When purifying the SteriPen screen shows that you need to be swirling the SteriPen continuously as the clock counts down to 0.  Follow the directions that come with the SteriPen for complete explanation on purification rules.


If you do not keep the two metal pins in the water as you are purifying the water you will get an unhappy face and a ? indicating if the water is purified.  When this happens start at the beginning and purify again.  I always slosh water out of the container on the rim of the bottle to have clean water on the rim for direct drinking.

Obviously you can boil water to purify it.  I found the SteriPen a simple way of refilling my water supply when hiking and living in my Prius using my 6 gallon water tank.

Brent

macaloney@hotmail.com

Saturday, May 6, 2017

Narrow Feet & Finding The Best Hiking Boot


Before I bought these $300+ Zamberlan Boots (above), I wore Merrell Moab 2 Boots to hike in.  I was reasonably  happy with the switch to Zamberlan until my 2016 southwest hiking they gave me problems.  Well, I thought my problem was a new issue but it wasn't.  What I found was that hiking the mountains around Tucson and Phoenix with the Zamberlan Boots the soles of the shoes did not bend and caused the heal of my foot to rise up out of the heal pocket and then back down, causing blisters.  This happened when I hiked over 2 miles of elevation. Around home I generally did not climb inclines over 2 miles continuously up. See the problem is that Zamberlan sells widths for wide or regular and not narrow width. 

The problem is with my feet being too narrow.  I wear a size 13 AAA and my foot is just too narrow to fill the heal void on boots.  I can pocket my heal and tie the boot nice and tight but my heal will still move up and down with a shoe sole that does not bend.  Narrow hiking boots are nearly non existent and the reason I went to the Italian boot company Zamberlan was they are generally narrower. 

Without a doubt I had found my problem and it was me.  Way too narrow of a foot for boots that are sold.


I decided to go to various hiking stores and ask questions and I was told the Merrell Moab Rover M (medium) was a bit narrower than the rest.  Above are my first pair of Merrell Moab Rover hikers size 13 M. They fit much better in the heal pocket than others and after I used them, I wasn't getting blisters.  I attribute this to the fact that the sole of the shoe bends and doesn't cause the heel to rise up out of the pocket nearly as much.  

When I was in San Diego this winter, after knowing I was going to Havasu Falls, I called in an order for a second pair of these boots as you can see they do not hold up as long as the heavier Zamberlan boots do. 


To make these Merrell Moab boots more comfortable, I replaced the innersole with the Dr. Scholl's massaging gel.  This improved comfort and absorbed some of the compression that exists descending.


When I tie these Merrill Moab Rover boots after they are broken in the laces eventually pull both sides of the shoe together.  This is because I have a narrow foot in a medium width boot.  I searched for an answer to this and found Osfit-Best Ankle Brace (above) for Arch and Ankle on Amazon.  They slide on over my sock and for me it helps in two ways.  First it helps fill any void in the heal area once tied and it allows me to get my boots tied tight when broken in so the laces don't pull the sides of the shoe together to touch.

Since I have found a this ankle brace that pockets my heal I can now try the Zamberlan boot again with it and see if it will protect from my heal rising out of the pocket and getting a blister.  If that works then I will have found a solution for my real good hikers.

Brent

macaloney@hotmail.com