Sunday, November 27, 2016

Installing The Prius Bed (Part 6 - Installing the protective covers)


Above i am ready to put the protective covers over the wiring.  Note that you can store some light, thin and soft items under the panels I put down.  You just need to be aware of the risk of damaging wires.  Soft things, including wires, etc., fit well in this space and stuff under nicely


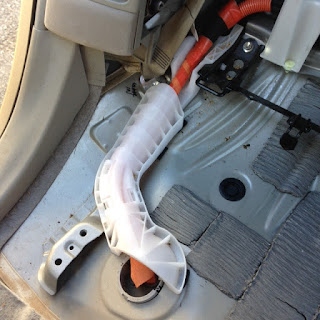
My first protection is a cut corrugated plastic to protect the wires that cross the gap to the carpet such as the fuel pump wires.


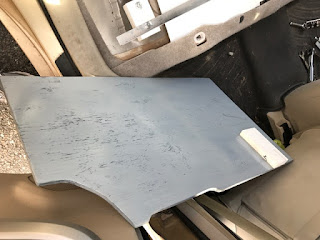
This panel above is again the 1/2" plywood with a piece of plastic attached to stabilize it from rocking.  These floor panels sit on the metal bracing.  You can see this bracing above.  It is black and panels rest on top.  There is no mounting hardware.  Also note all the intricate angles and notches in the plywood.  When I originally designed this system it took me a long time of trial and error to get it right. 


Here is my 60% side protective panel is in place.  Notice the space on the end facing us for small things to be stored.  This is an easily accessible space.


Now for my 40% side protective panel with my fire extinguisher mounted to it.  Since I don't use this side for a bed I use it to sit on with a couple of cushions when I want privacy usually before I go to bed.

Removing the seats and making the platform opens up so much space over leaving the back seats in.  

In a few weeks I will take the next step and start installing the water tank and storage unit that goes above where I store my clothing. Although I have covered all these items in various blogs before I will group them together to make it easier for future visitors to see.  I will also be more comprehensive on what and how I do what I do as I did here.  

Much tanks to an avid reader of my blogs for getting me to blog this build series and provide details on all the pieces and how I did it.  I plan to be at the RTR in in Quartzsite, AZ with other Prius travelers starting January 10.  I am a member of CheapRVLiving.com where you can find details on the event and join and learn about how others modify vehicles to travel in.

A shout out to others that have asked for a greater YouTube presence from me.  This series of blogs on how I build my Prius bed system is an excellent example of a good YouTube upload.  I find it hard to do videos in such a small space as a Prius and I need someone to run a camera while I do my thing.  Hopefully in the future I can make it happen.

Until next time safe travels everyone.

Brent

macaloney@hotmail.com

Installing The Prius Bed (Part 5 - Installing Bed Platform)


The time has come to install the bed platforms.  Above I am installing the 60% side that I sleep on behind the front passengers seat.  I utilize the Prius fold-down rear seat pivots to mount my platforms. Note that these platforms are multi-articulating and are shaped in a way to meet the curvature of the Prius either up or down,


This is the view of the underside of the platform.


Above the platform is installed.  Note the curved shape to match the Prius curves.  Also note the hinge on the top and one near the center.


Above I folded down the platform and the support that is hinged swings out and sits on the aluminum bracket I made to support the bed


Next the second hinge folds out to fill the gap behind the front passenger seat.  It is supported by the center console armrest and will also be supported by the water tank/storage unit that goes on the rear passengers side floor.


Next I install the 40% side (drivers).

Although I have designed the rear to be a full bed side to side I have not used it that way as I solo travel, but if two were to sleep in the back this corresponding fold down would allow for full side to side bed.


Here both fold-down's are up.


Since I leave the 40% up and my compressor fridge sits behind it I lock the seat so it will not come crashing forward.


I design my retainer from an eye-bolt that holds the plywood back and to the Prius seat locking bar.

Part 6 will cover the installation of the panels that protect the wiring.

Brent

macaloney@net1plus.com


Installing The Prius Bed (Part 4 - Bed Storage Support)


In order to have my 1/2" plywood design support my weight I need to support the plywood when it is lowered into place.  When I lower it there is no flat place to support the plywood and no good way to protect the wires to the gas tank (above) or the high voltage battery cable (orange) below


I noticed that there were brackets on the door side of the gas tank and another bracket door side on the high voltage battery cable side.


Further inspection of these brackets show that both have a threaded hole and a punched hole.


If I could find a way to bridge the two brackets side to side I would have a level surface to work from.


Above I designed this aluminum angle stock but then I needed a way to support it and connect it to the unused Prius brackets.


Above is the passenger side where I took a block of plastic wood that I use for my projects and the bolt to the left is the threaded hole so I used a metric bolt and bolted the plastic down.  I then drilled a hole in the plastic to align with the punched through hole and bolted the angle aluminum to the block. 

I needed the bar as far forward as possible as there is a hump in the middle of the metal floor and also this gave me the lowest profile for protecting the wires without loosing too much space.


I made the plastic block and bolted it the same way on the passenger side with the high voltage hybrid cable.  You can see that the Prius has the wires for the fuel pump and they fit nicely under the metal support I made.  I needed to add a couple pieces of plastic wood to the underside of the angle aluminum so there would be intermediate support along this soft aluminum stock.


You can see how close I come to these wires in the middle of the area I span.  Note the plastic wood elevating the angle aluminum on either side of this connector to protect it from damage.


Since the bolt that goes though the through hole has a washer and nut on the underside you need to wrench the bottom nut and ratchet the top to tighten.

The next part  will install bed platform.

Brent

macaloney@hotmail.com

Installing The Prius Bed (Part 3 - Removal Of Seat Back Cushions)


This step involves removing the rear seat back cushions.  Above I have folded the drivers side seat cushion back down and removed the bolt that goes through the pivot bracket to the seat back.


Install the bolt back into the seat back.


Here you can see the seat back on the drivers side removed and already stored.


Above I am now exposing the seat back bolts on the passenger's side (60% side).


Again remove the bolt from each side of the seat back from the pivot brackets.


Don't forget to store the bolts back in the seats so you know where they are when the time comes to reinstall.

 Store your two seat backs before starting Step 4 - Installing bed storage support.

Brent

macaloney@hotmail.com


Installing The Prius Bed (Part 2 - Removal Of Seat Belts)


Above you will see the shoulder belt on the passenger side rear that loops though the guide at the top of the seat.  Remove the belt from the guide.  This seat belt and the corresponding one on the drivers side will not be removed.  We remove it from the clip for later removal of the seat-back cushion.


Above the center seat shoulder harness is integral to the 60% fold-down seat back.  Do not remove the bolt at the bottom that secures it to the lap belt receptacle.


There is a bolt that holds the bracket for the seat belt receptacle to the floor and this bracket also secures the center shoulder belt to the car.  Remove the bracket bolt in the center to the floor only!


Use a 14 mm socket with 6 inch extension.


Removing the bolt allows the shoulder belt to lift the bracket and seat belt receptacle.


Reinstall the bolt into the hole that it came from.  This way you will not be looking all over the place for the bolt when you want to reinstall the seat back.


Moving to the passenger side there is a set of seat belt receptacles that you will remove the center bolt as you did above.


Then reinstall the bolt as you did above.  Note that I have written on the metal brackets where they are positioned for when I reinstall the seats.

I take this loose part and a spare bolt and nut and connect it to the open hole in the other seat belt receptacle so all the parts stay together and not get lost for future reinstall.


As with the passenger side shoulder strap you leave this connection to the floor of the Prius there is no good way to remove the other end behind the rear inside panels and the belts will not be in your way.

We are done removing the seat belts.  The next step is to remove the seat back cushions.

Brent

macaloney@hotmail.com


Installing The Prius Bed (Part 1 - Removal Of Bottom Seat Cushion)

This post is the first of a series of posts on how in install my Prius bed platform.


The first step is the slide the front drivers and passenger seats all the way forward as you will need to climb in the back seat area facing the back seat for removal of the Prius bottom seat cushion.


In the center of each of the two seats near the front of the cushion there are these white clips that the Prius seat has a corresponding tab that locks into.  With some force you need to put your hands under the front of the center of either side and pull up to remove the tab from the white clip.


Above is a closeup of the plastic clip and the metal part from the seat that locks into it.


Once you have the front of the bottom cushion lifted you need to raise the front of the seat cushion a few inches and push down at the crack of the seat to get a loop in the seat cushion out of the black metal tab that sticks down.


Above you can see the rear seat cushion pulled forward and the two metal rings with seat foam on them facing the seat crack area.  This is why you need to push down in the back of the bottom seat cushion to get these free from the black tabs.  Once you have done this you can store the seat bottom.


Above is what under the rear seat cushion looks like.  On the far side (drivers) is the connection for the fuel tank and closer is this milky colored plastic covering the orange cable.  This is your Prius hybrid battery cable.  Later we will make a platform to protect these cables from damage.

Look for blog Part 2 - Seat Belt Removal.

Brent

macaloney@hotmail.com

Wednesday, November 23, 2016

12 Volt Rice Cooker For Prius Campervan Travels


In planning my 2017 Travels in my Prius, I wanted to find a way to cook rice on the road without setting up my stove and sauce pan to cook the rice when I am not in need of cooking other food.  I enjoy my RoadPro 12 volt 20 oz water heater so I decided to look for a 12 volt product to cook rice.  

The reason I don't use the RoadPro 12 volt water heater is that at the bottom of the RoadPro the heating element is immersed in the liquid and cooking rice means that the rice would get attached to the element.

It took some research to find the 12 volt rice cooker in the picture above.  I checked Amazon and eBay but found nothing.  I finally found this product on AliExpress for under $30.00.


They make the rice cooker in different voltages. Here my packaging shows that it also comes in 24 volts and the website also had 120 volts and 220 volts.  Of course, running this product off of 12 volts is more efficient than running it at 120 volts off the inverter. 


Size was also important to me living in my Prius.  I was happy to find this product was a mini rice cooker.  Thus the size should be accommodated in my Prius travels.  In the case of the rice cooker it is not a need but a want.  I have lived in my Prius for 4 months for two separate years and didn't have a rice cooker so I can live without it, but I wanted to try it.


This 12 volt rice cooker comes with a small pan on top and this can be used like a double boiler, with the rice on the bottom and a small piece of fish or some chicken cooking on the top.  Remember that this is small and will make rice for two but the top pan will cook about enough fish for only one.


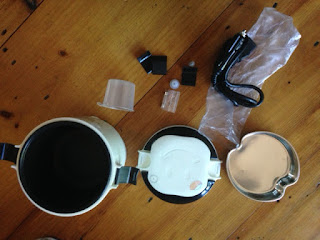
The rice cooker accessories come inside the bottom of the pot, except for the serving spoon that is supplied in the box..


The rice cooker comes with a the power cord, measuring cup and extra clips.  The clips are a nice feature as the cover is held tightly on with two clips to keep the cover from falling off.  There is a small hole on top of the cover to act as a vent to let the expanding air from boiling water pressure out


Check out the handles that flip up from the lid.  This makes moving the rice cooker when hot easy without pot holders.

The cooker is 6" tall and 6" diameter at the widest part clip to clip.


Above is the serving spoon supplied with the rice cooker in the box but does not fit into the rice cooker for storage.


My test of cooking rice was done with a spare Prius AGM 12 volt battery.


As I said above the serving spoon would not fit in the rice cooker so a little sanding on my belt sander to the plastic spoon allows me to store it int he pot with the rest of the accessories.


Here are all the accessories now stored in the bottom of the pot including the spoon.


Next I place the top pan back in the rice cooker,


Finally the top of the rice cooker is clipped on and I am ready for the road.  Note the small vent hole on the upper right corner with writing that says caution hot.


Another consideration is how many amps does it draw for my Prius 12 volt power system.  I fuse my 12 volt Prius circuit at 10 amps.  A test shows the rice cooker draws just under 7 amps.

Note that cooking in the rice cooker is not as fast as heating water and cooking on my butane stove, but it gives me flexibility in cooking options.  It took me about 30 minutes to make rice.

Of course I will use this cooker on the Prius 12 volt system that I have wired in the back of my Prius with heavy wires to prevent power loss, while the Prius is in "Ready Mode" so the 12 volt Prius battery is not depleted.  Just as I do when heating water with the RoadPro water heater.  

Since the rice cooker has a wide bottom and sealed lid it will be ok to use while driving.  Thus I can plan and have my meal ready when I arrive somewhere and if it is bad weather conditions for cooking with the stove I have the ability to still cook a meal inside the Prius.


After getting my rice cooker I was able to think of other usages of the cooker beyond the rice and cooking meat or fish on the double boiler.  Since the inside is coated for easy cleaning, there is no reason whey I can't heat canned soup, make prepackaged dry soups by adding water, cooking beans and cut hot dogs, oatmeal cereal, and so on.  

Here is my finished rice and I am ready to use my 12 volt rice cooker on my 2017 travels. 

Brent

macaloney@hotmail.com