Tuesday, February 13, 2018

Camper Swinging Pipe Table


I didn’t invent the pipe table for campers.  I just applied the concept to my camper using my design concepts.

Above is my white PVC pipe holder.  The key is to match the PVC size with the size of the galvanized pipe you use to have a nice fit.

On the bottom of my PVC pipe is an end cap.  On the top is a double female union fitting to put two pipes together.  I ground out the bead in the center of it so I could slide it down on the PVC pipe all the way.

The reason for this is that I needed thickness to get the head of the screw to resess into the pipe so the galvanized pipe would not hit the screw head.  Thus the wall of the PVC pipe alone would be too thin to support the stresses of the table.

Not that is my 24 hour hot water tank tied to it.  I make hot water and store it in this excellent Thermos to have hot water for 2 days for washing.  The PVC pipe is a great place to secure the Thermos.


My cabinets are 18” tall.  The same height as the knee walls in the camper.  I have 2” of seat foam, so the height of your first pipe needs to be sized for this height requirement.  Then add a 90 deg elbow.

Yes you have to decide where to put the PVC pipe to align with other pieces and not be in the way.  Not the PVC is not higher than cabinets/seat.


Next you need to size the length of the horizontal pipe for swing and mounting the table top.  All this aligning of the PVC pipe and connections is the hardest part so you end up with what you want.  

On the end of the horizontal pipe is a street elbow.  
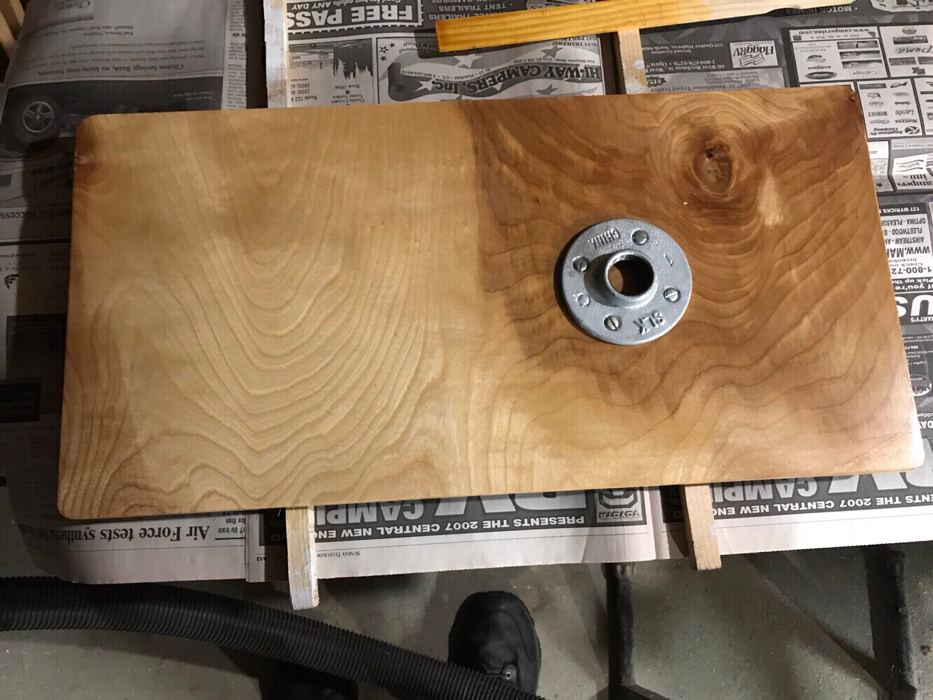


Note that I sized my table at 12” x 24” as a guess.   I also offset the flange oi put on the table that screws on to the horizontal pipe with street elbow.  


Here is what I ended up with.  I can swivel the table up to counter cabinets for extra counter space or just out of the way.


Here my bed is inclined and the table swings to be a bed or bedside table when watching TV or working on netbook.


My lower bed is also a bench so table can be swung so two people can eat off of it.  It’s tight for Space but better than no table.
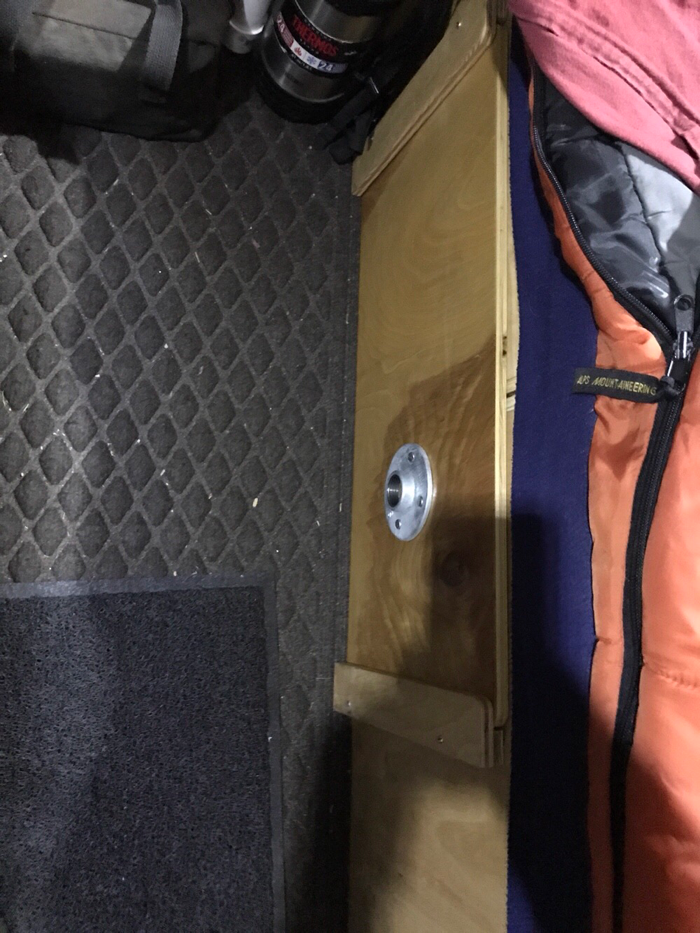


The table top stores on the side of the bed boxes I made and just slides up and down as needed for removal and replacing.

The horizontal pipe is stored in the PVC pipe and the long vertical pipe is stored under the bed in a long box that comes with the camper.

Brent 

macaloney@hotmail.com

Camper Fresh Water


Above are two 4 gallon water tanks (blue) waiting to be installed in the camper.  The one between the counter cabinets (left) and the single cabinet to the right is the fresh water tank and the location I will install it.

The 4 gallon tank closer will be the waste water tank and will be the subject of a separate blog post.

Note the single cabinet to the right came with the camper and housed the heavy lead acid AGM house battery before I redesigned the 12 volt system.  Now it will be used primarily for my clothing.


Above I have made an adjoining cabinet to house the fresh water.  The tank is secured in place with 3/4”x3/4” shims around the base.  The weight and storage of things around it keep it from moving so far.  I could add a strap if needed.


Above the water tank I made my potty.  The two holes are finger holes to lift out when I fill the fresh water tank below.


The potty is made from a simple stainless steel salad bowel.


This picture above is the finished water tank with fresh water hose that goes to the sink hand pump.  The funnel for filling is on the back side of tank. 


The tubing to the pump fits perfectly through the flange that screwed into the water tank cover where a spigot that comes with the tank goes and is not used.

The supply tube makes a loop and then up through a diagonal hole into the side of the counter cabinet, along the back of the cabinet and up to the pump.


Above is the water pump I used and mounted to my counter.  I’m not totally happy with this pump as it has leaked around the pump handle.  It is temporarily fixed with Teflon tape around the handle threads.


Since I need to fill the 4 gallon blue tank in-place in my camper, I use a one gallon water jug to fill it one gallon at a time.  I carry this expanding 3 gallon jug to get water at one of the many water kiosks out here.  This expanding jug also allows me to bring extra water into my desert trips.  4 gallons inside, 3 in the expanding tank and 1 gallon jug for a total of 8 gallons for a week in the desert.

The system works good and I’m happy with it.  I would like to replace the blue tank with a commercial poly tank with an external fill and drain, but for my first year it’s great.

Brent

macaloney@hotmail.com

Camper Bed / Bench And Storage Cabinets


I want a bed on the lower passenger side of my camper so I can stop in rest areas and truck stops and sleep without raising the camper roof.

Above, a shell camper gives you a clean slate to build what you want.  I originally thought of having a fold out or up bed platform.  The existing shelf created by the wheel bumps in the truck bed give me part of the bed. 

Then there was the question of how wide a bed did I want, and the realization that I lacked sufficient storage space.  

The solution was to build storage cabinets.

Here is how I made mine.


Above, I have this spot to fill at the back of the camper that is larger than the rest of the space.

Here I had to decide on my bed width.  I picked 24”.  This width worked fine for my Prius living so I was sure that it would work on the camper too.

The above box uses the notch of the door frame to hold it in place.

Yes it overhangs the door and entrance a bit but so do the seating that FWC puts in their side dinette model.


Note that there is not a plywood floor in the box.  This was deliberate.  1/2” plywood and no floor to save weight.


The next spaces I need to fill are narrower and need to be removable to access the front and rear sliding doors as shown above.  These sliding doors is where I access the turnbuckles That hold the camper to the truck bed and need to be accessed during the trip.


Here box two is installed with box 1.  Box 2 being king and not wanting the plywood to bow, I put a center plywood brace on the bottom.  Covers will come later.


Here in the picture above my finger points to a separating board to match the width of the bracket that holds the cabinet to the camper knee wall.

To the left of my finger there is a long storage cabinet that has a cover that overhangs where I am putting this box.


On the left above is the camper knee wall, on the right the back of the box I built.  You will see a darker border on the cabinet (right) as to keep the box from moving I need to have the sides built out to account for the dovetail hanging brackets (black) and the sliding door that is right below.

The dovetale brackets are self aligning and lock the cabinet into place as you slide/drop the cabinet into place.


Here is a better picture of one of sliding doors that I need to be able to access for tightening during my trip. The brown bump is the sliding handle.


As I mentioned above the long cabinet that comes with the shell has a cover that overhangs the space of the cabinet opening that I am adding and it hits the board I made to offset the box.  

Above I use a rabbit plane to remove some material so the cover of this long storage area will sit flat with my add-on cabinet sits up against this knee wall.


Here the rabbited edge is flush with the top of the long cabinet.  All this work is done to have the cabinets I am attaching fit snug against the knee wall and all covers are flat across the top.


Now the picture above shows the metal trim edge of the long storage area cover sits in the rabbited area that I just made.


I have now made the first box cover and hinge plate.

Note that the cover on this cabinet sticks out a bit for easy opening.  This is a very important storage space as it is accessible while standing outside as well as inside.  It holds power cords, wheel chocks, tools, and misc items.


Above I have added the hinge plate.  This is the piece of wood that the fixed hinge side gets mounted.


As desired all the boxes and covers align.


Box 1 & 2 now have covers and hinges.


I’m done making the bed boxes, less polyurethaning them.  That finishing task will have to wait until I’m on my trip, as I have so many things to do to be ready to leave on 12/26/17.


I bought the foam for the bench/bed from Amazon.  I used firm foam and it is 24”x72”.

I slid it inside my fleece sleeping bag to provide a quick cover for the trip,

Brent

macaloney@hotmail.com


Monday, February 12, 2018

Asian Market Shopping


Those that follow my travels in the past, you u know I use butane cylinders in my one-burner dual fuel butane/propane stove.

I generally buy my butane cylinders at Walmart, but they have been out at the Walmart I have been using.  So, I went to a Big 5 sporting goods store and bought one cylinder for $3.99.  At Walmart I pay $2.99 each.

Asian Markeys are known for selling butane cylinders for a low cost, so I went looking for an Asian Market.

In the photo above is the Giant-Stone Market in Tucson I found in my Google search.  After playing 18 baskets of disc golf before the high winds come in this afternoon, I headed over to the Asian market.


While browsing the store for the butane, I looked for noodles to cook in my rice cooker.  Above I bought some noodles and a package of rice pasta.


In the last isle I found the 4-Pack of butane cylinders for $4.99.  Such a deal!


For lunch I made some of the noodles I bought at the Asian Market in my rice cooker.  It’s so windy I cooked with the roof down at a local city park.  Today my solar panel supplied all 7 amps my rice cooker needed to cook my noodles.  That’s right my Lithium battery was already full and the solar panel supplied all the power not needing the battery.

The solar panel feeds my LiFePo4 solar charge controller and I have the circuit I connect my rice cooker to from the load connection on the solar charge controller, not to the battery.  This way I can use solar power directly from the solar panel and leave my LiFePo4 fully charged.  If I require more power than the solar panel supplies it will feed both from solar and battery.  Today was the first time all power cam from solar.

Brent

macaloney@hotmail.com

Saturday, February 10, 2018

Salad Bowel Camper Sink


I wanted a sink in my camper, but I wanted it relatively small.  The previous owners did not have a sink and FWC does install one on some models, but not this shell.

I decided on a salad bowel sink for simplicity and cost.  I went to the local discount store and for a few dollars I bought a stainless steel bowel and drilled the sink tube hole.


The drill bit took a lot of abuse cutting through the stainless steel, but worked ok. 


The first tube I bought was the wrong one as it was designed with vent holes in the space between the upper and lower porcelain sink for the overflow.  Since I have no overflow I needed a solid drain without holes.


I needed to remove a number of the threads on the plastic drain tube by filling them off.  I needed to do this to shorten the length of the tube so I can put the waste storage tank on the shelf below and have the water flow directly in.


I used the standard pladtic drain fittings on the shorter tube and the assembly was too long considering the height of the tank and space available.


I tried right angle plastic pipe fittings and it was still too long.


I had one of these rubber hose adapters in my wood shop, so I cut it and found it worked perfectly to reduce the drain pipe to the pladtic fittings and shortened the drain on the sink.


I also added the right angle to the waste water tank and I was able to match the height of the sink to the tank and only needed to connect with a hose.


Here is my finished sink.  Since the bottom of the salad bowel is flat and the drain has a slight taper the stainless buckled in a couple of places.  This is not a problem as you use plumbers putty on the flange of the drain pipe before tightening.

Brent

macaloney@hotmail.com


Tuesday, February 6, 2018

Prius Travels Thought - Solar


My solar on my truck camper is better than what I thought.  I am so happy not having to run the engine to get the power I need to keep my Engel fridge, TV, Fantastic fans, and charge things.

This is a no worry system by now.  It hmjust does its job every day.  I have to see how it works when I get back easy but now it thrilled.


When I designed and installed solar on my friend’s RAV4 to charge her Goal Zero, I knew from my Prius Campervan days that having to run the engine on the Prius or hang my 60 watt solar panel was a pain to do and think about.

I told her that if I learned one thing from my Prius Travels was to put solar on the roof and let it do its thing, whether driving or parked the solar is doing its thing.  You don’t have to worry about driving our putting out a panel.

She is also thrilled with this decision and glad I talked her into buying the roof rack and with my design to hang the solar between the cross bars for a very stealthy look.

Back to my Prius.  If I was to go back to the Prius dwelling I would get the Toyota roof rack and install a solar panel the same way I did for my friend and I wouldn’t have to run the Prius to charge my house battery, just to cook, heat, or cool.

Brent

macaloney@hotmail.com

Ordering And Getting Deliveries On The Road


Getting items delivered from Amazon on the road is easier with “Amazon Locker”.  Above is a QT gas station here in Tucson where I had my Amazon orders delivered.

Getting Amazon orders delivered couldn’t be easier here in Tucson, now that they have Amazon lockers.

When placing my orders I selected other for a shipping address and Amazon Locker locations in the area come up.  I selected the location above for my deliveries.


When amazon delivers my order to the locker I get an email like the one above to pick up my order.


I place my phone with this barcode from the email notification showing, under the scanner on the locker, and it reads it and the door opens exposing your package.  This is a 24 hour service.

You take your package and close the door and your done.  There is no extra cost for this service.

In other small locations like in Quartzsite, I use Quiet Times, as I did last year with some success and one order that wouldn’t be delivered.  There is a small fee for this service.  The difficulty in shipping to a place like Quiet Times is that you do not know if it is shipped to the postal service or UPS driver.  UPS delivers to the door and you can pick up your item that afternoon.  If shipped through the post office it takes at least one extra day to get your order.  This is because of the backup at the post office due to the number of packages and mail that comes through that office with all the people in town.

Brent

macaloney@hotmail.com