Thursday, June 9, 2016

Fixing IPhone/IPad Lightening Cables


I do many things on the road including fixing things as much as I can to keep costs down.  I don't carry a lot of tools but do bring tools for fixing wiring terminals, along with a small soft sided tool bag that I keep in the trunk.


I have an IPhone and a IPad that I use with USB lighting charging cables.  I also have a variety of other 12 volt USB cables.  

I power my iPhone during the day  through a 3- hole cigarette adapter with multi USB charging ports.  This gets plugged into stock Prius outlet in the front center console area.

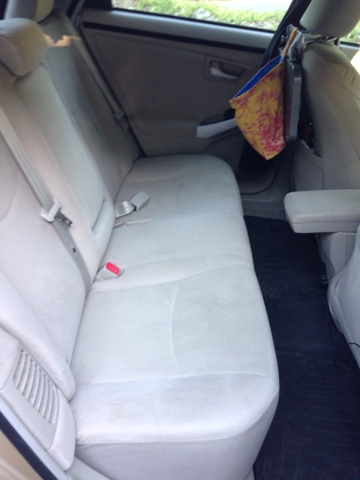
As I drive I plug my IPad to my Prius 12 Volt battery panel I made to a dual USB charger in the back.

I plug my devices in every day and the Apple Lightening Cable end to the device wears and insulation breaks and since it is not strain relieved the insulation breaks and pulling is hard to do on just the small connector.

To extend the life of my cables I add shrink wrap to the end that plugs into my apple devices.  I buy a variety size pack of shrink wrap from Amazon.


The shrink wrap that comes is not a perfect fit so I stretch it some to fit over the connector.


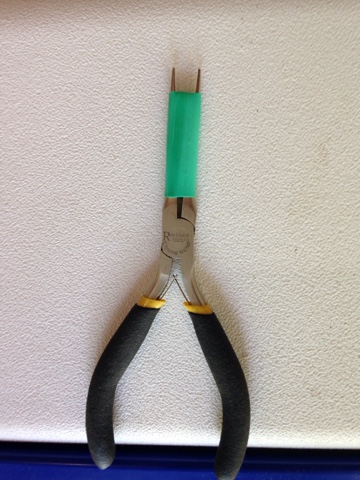
I stretch the shrink wrap with needle nose pliers just so it fits over.


I stretched this piece by about 1/8".


I then place the shrink wrap over the connector and use the butane torch I bring on my trip to shrink the wrap and make a stronger cable when inserting and removing the lighting cable.

Note: The butane mini torch has many purposes including being a match to even start a campfire.  Since I use a butane stove I have butane to refuel the torch as needed.

In the evening my iPhone and IPad are fully charged and use my house battery bank to power my Engel compressor fridge along with my USB powered fan when needed.  (See separate post on my house battery system.)

Even though I live in my Prius when I travel, it is possible to carry a few tools and not have to spend money buying new cables when you can keep usable a little longer.

Brent

macaloney@hotmail.com


Wednesday, June 8, 2016

Dealing With Wet Things In A Prius


I was recently asked how I deal with wet things in a Prius.  Dealing with wet things is no fun in a humid climate regardless of it being my Prius or the Class B that I had.  The problem is the moisture getting into the inside air and when the temperature drops at night condensation becomes a problem, especially on the windows.  

When I am ready to drive off in the morning I need a dry hand towel to wipe the front windows and it is soaking wet when I am done.  Having this much moisture inside my Prius is not good for stealthing as the moisture is visible from the outside of the vehicle and is a telling sign of something is different with this vehicle.

One of my recent posts on bathing in the Prius I neglected to say what I do with the two wet drying towels and wash cloth after washing.  I recommend in places of higher humidity and when the temperature will go down to the dew point is to put the wet towels in a plastic bag overnight until the next morning when the higher temperatures allow moisture to evaporate into the warmer air.  

I leave my privacy cover in the back in my Prius living design as it is great for hiding my sleeping area and fridge.  It is vinyl so I lay the wet towels on top of it during the day to dry, as seen in the picture above.

Note I only use small thin towels not heavy bath towels.  I do this for two reasons.  First is space.  My towels take up little space.  Also they drive fast.

Now if I'm not stealthing where moisture on the windshield is an issue and where running the Prius engine is not a problem I will run the Prius heat with A/C to dry out things for about a half hour.

My wet coat will hang over the front passenger seat.  Shoes sit on rear drivers side floor where my seating area is.  I have a hiking rain suit and my hiking boots are waterproof so my clothing generally is not overly wet from absorbing water.

I carry two bath towels and two face cloths and a hand towel for my lap when washing my hair.  This way if my towels are dirty before I wash, I have a second set to get through the week.

Brent

macaloney@hotmail.com


Thursday, June 2, 2016

Morphing From Prius-Living to Prius Car


Every summer I evolve out my Vandwelling modifications and transform my Prius back into a passenger car again.


It looks like a lot of stuff but it's not.

The sleeping bag and sleeping pad take up a lot of room but they are rolled up and put into their respective bags.  The Engel Compressor Fridge stays for use during my summer driving travels.


Taking out the articulating plywood platforms (one each side) that bolts to the rear seat backets and removing the protective floor platform under them takes the most time.


Above are my plywood pieces removed from the Prius.  The bar with white blocks  mounts using threaded and non threaded holes on the Prius floor under the seat cushion.  This is a piece of aluminum angle bar that uses the blocks attached to support the aluminum in the middle so it doesn't bend out of shape.

Note all plywood is 1/2" and this design is the lightest weight and fully supports me with no problems.


Above I have bolted the seat backs in and I'm sliding the seat cushion into place.  The seat reinstalation is simple.


Removing my fresh water storage tank is also easy.  Just drain the water and unscrew the white plastic storage bin from the water tank and take the parts out..

In all it takes about 1 hour to convert the Prius.  Of course vacuuming and washing things will take a second hour.

I do not remove the curtains, although not hard to take off, but I sometimes use them for privacy during car travels.

My goal was always to restore the Prius back to its original vehicle status.

I know some of you have kept your back seats in for your travels.  I can say that removing the seats adds so much space for living and it isn't hard to do at all.

Making the plywood platforms by designing and testing and cutting and recutting takes the time but once it's done the ease of conversion is well worth it.

If you travel in a car other than a Prius, I would suspect you could make a similar backseat design to what I have made.


Oh, one more thing.  I leave my Prius house battery setup installed year round as I use it for my car driving travels.


The same is true with the Prius 12 volt battery connections.  They stay in year round too.


After removing my Vandwelling things I took a trip to Vermont and yes I got 64.5 MPG on the way back to MA.

Of course I have to pay attention to my driving to get this Milage but I ask what are you getting?

Brent

macaloney@hotmail.com


Tuesday, May 24, 2016

Finding Places To Stay Free Or Low Cost


Above is my free campsite (2016) at Ocotillo Wells State Park in the California Desert west of the Salton Sea.

My first year traveling (2014) with my Class B campervan I had a concept of staying overnight free or low cost but being new to this way of life, I didn't know the possibilities of where to stay.

I left MA in 2014 and on my way to the southwest via Florida I stayed at campgrounds if I didn't have a plan on where to stay for free.  I was apprehensive to park at Walmart in FL as my Class B stood out.

I stayed in the yard at my aunt's place in a trailer park for free, but this was a no risk thing to do.  It was free and convenient.

I stayed at my cousin's in south Florida in her gated community apartment complex parking lot, taking a bit more risk as there was roving security.

I then traveled around FL to Everglades National Park and private campgrounds spending money every night.  The best was the Everglades National Park where I got my senior pass and half off my camping there.  At the private campgrounds I paid $35 to $40 a night.

I stayed in Northern Florida at a state park not knowing there was free Fotest Service disbursed camping 10 miles away.

I traveled across the south heading west to AZ on I10 and I finally became brave enough to walk in to a casino in MS and ask permission to stay the night in their parking lot.

Then I did the same at a Walmart in TX.


I had the App for my IPhone called AllStays.  That provides both paid and free overnight stays.  It is a good tool but it is not nearly comprehensive enough to cover all places.

In the month it took me to get to AZ in 2014 I had paid out a few hundred dollars to stay overnight.

The rest of my first year was pretty much the same way spending money not knowing the ropes to boondock and disbursed camping.  I was not wanting to take risk or be rousted by the police and staying in a few free places including truck stops.

My second year (2015) I had sold the Class B and bought the Prius for this year's travels mostly because of the cost of fuel and not because of stealth.  Stealth turned out to be a great option with a Prius as no one expects someone to be living in such a vehicle.


Although changing my mode of travel was the most significant change, joining CheapRVLiving.com (CRVL) and learning from others shared experience from the Vandweller Community was second.  

I wished I had known about this group the first year 2014.  Unfortunately, I was not able to leave early enough in 2015 to make the RTR group gathering in Quartzsite, AZ that year.

I arrived just after the event and met a fellow Prius Traveler Suanne in nearby Ehrenburg, AZ.  Suanne is someone who helped in my inspiration of traveling in a Prius as she has been doing it for years.

I also met Bob Wells, the founder of CRVL there.  Although I didn't get to meet others and absorb their knowledge, I was online and gleaming what I could from the online group forum.


This year (2016) I left early enough in January to make the RTR, and there the one on one sharing flows easily and friendships are formed and faces replace online handles people use on e group's forum.

So, regardless what you travel/stay in I recommend joining CRVL and start your learning process.

Now back to where I stay.

Driving a Prius is like the ultimate stealth vehicle if you manage how you handle yourself effectively.  This means that you can park many places and not be noticed provided you don't do things to stand out.

I will create a separate post on stealth in a Prius later.

First do not park where it is posted no parking or no overnight parking unless you ask permission, like Walmart.

I generally do not stay in the same place two nights in a row (truck stop, Walmart, rest area, casino) unless it is generally allowed like BLM, Forest Service, Federal, or State land.  If allowed with no signs saying otherwise, you need to follow the rules for the land you are on.  For example BLM land has a 14 day limit in 28 days.  In AZ it is easy to move every 14 days 25 miles away and come back if you like. You need to learn the rules and you will over time.

(FreeCampsites.net screen capture on IPhone)

FreeCampsites.net is a great website to augment AllStays.

Campendium.com also provides listing of sites.

You get federal maps online or at the Federal office for that area.  You look for Disbursed Camping online or ask for rules.

There are other paid sites but I generally don't use paid sites.  I find enough places to stay with free sites.

What I did learn was that if a site is listed as BLM there will be one pin drop for each area.  The is does not mean you can only stay at that one spot.  You can stay many places in the area.  Even if the Forest  Service shows camping for a price on your app there may be disbursed camping at no cost in the area.  You again need to have the rules.  The best rule is if you find a campsite with a fire ring and it is disbursed you can stay if not posted otherwise.

I never have fires so any existing pullout is good for me as long as not posted.

There are apps and websites with maps of federal lands.  There is so much land in the southwest that it's not hard to find a place to disburse camp I the general area of interest.

This year (2016) I found free disbursed camping outside each of the 5 National Parks in Utah.  

The thing to remember is that if you are over 62 you can get a lifetime pass to the National Parks to get in and half off camping.  This is a good deal and could be better than looking for disbursed camping.

From time to time I stay in cities and towns using legal street side parking.  I scout out the area in advance and have a backup plan.  At dusk I park and slide into the back for the night.  Close my shades and leave before 6:00 am.  Then not use that area for days.

I would say that is you choose to travel this way you will learn from others and join CRVL and if you have questions there are I've 1700 people that can help answer your question. 

Many people go to the RTR for their acclimation to this life.  There will be a summer RTR outside Flagstaff, AZ in June.

Brent

macaloney@hotmail.com


Sunday, May 22, 2016

2016 Prius Travel Expenses

   2016 Prius Travel Expenses Graph

My goal for my Travels this year (2016) was to spend less than last year with my Prius and be under $4,000 for my total expenses.

 2016 Travel Expenses by Percentage 

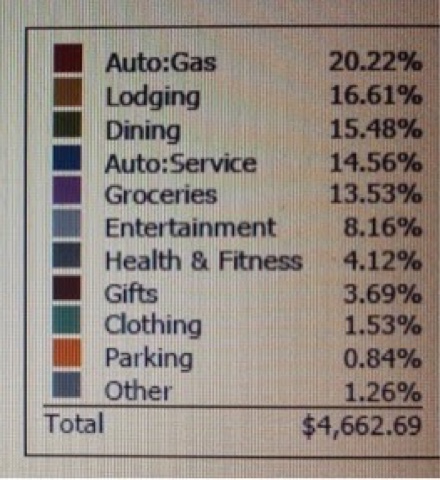
The fact that the price of gas was significantly less this year did help but this was offset by my use of the Prius to provide heat and cooling to maintain a better living environment in the Prius.  So my MPG was reduced from 52 to 46.  Either way I had less cost for fuel by about $100.00.

The big savings was in lodging.  Last year (2015) I spent $774 in lodging and this year I only paid to stay one might at two different National Parks for less than $20.  Lodging doesn't even register as a category this year and is grouped under other.

I did spend time with family:
Monterey, CA (1 week - same as last year) 
- Park City, UT (1 week - same as last year)
- Las Vegas/So. UT/No. AZ (1 week addition to last year)
- Elkridge, MD (1 week - same as last year)

Staying with family does help with some expenses but some expenses remain.

The big savings came into play by not paying to stay/camp at very many places at all.  I learned over the previous two years how and where to park and to camp and save money.  

        2016 Travel Expenses by Cost

Last year (2015) I did have an accident by hitting the curb and I needed to replace both front tires as they were bith getting close to wear bars.

This year (2016) I did get a flat that needed to be replaced but I had newer tires and only had to replace one tire so auto service was higher last year by $150

This year's cost of $3116 for 117 days is $26.63 per day cost.  This is so much better than my goal the first year of $50/day that I over spent.

Staying under $4000 ($1000/month) was possible this year and I can fit this in my budget.  Since I did so well on saving I could foresee using my Tacoma with a light-weight camper is possible too.

The other place I saved this year was paying for a shower once s week vs every couple of days. I did this by fully washing every day in the Prius between showers.  I will be posting on how I wash in the Prius in a separate post.

Below is the data for my 2015 Prius Travels so you can see the comparison on my spending.


Comparison to prior year:

 2015 Travel Expenses by Percentage 


     2015 Travel Expenses by Cost

Brent

macaloney@hotmail.com

Bathing In A Prius


Actually i have been thinking about posting how I do fully wash in the Prius for awhile now.  It was a question someone left on my blog that has me now doing it.

The picture above is of my seat-back table with my wash basin and squeeze bottle on it.

Background:

The back seats of the Prius are removed.  I made a platform on the Passengrr side (60%) for the fixed bed.

Behind the drivers seat (40%) side I have a seat I made.


I make my hot water earlier and put in my 24 hr thermos.  


I have a small wash basin.  The kind they give in hospitals.  I store it behind the seat where I sit in the back.


This is important.  My side window curtain has a bungee that holds it tight against the door at the bottom of the glass.  This is important because without it your body constantly rubs the curtain since the side body curves out on the side.


I hope you can see the bungee above.


The Washing Process:

I take the hot water in the thermos and pour some in the squeeze bottle to get warm water.  I use this for rinsing.

While undressed and sitting in the seat I put towel on lap and basin on top of the towel.

I put warm water in the basin and use face cloth to wet my hair.

Then I use shampo to wash hair and with my head bent over basin I rinse my hair with water in squeeze bottle.

I have a separate towel to dry my hair.


With hair done I now sit on my bed and face towards the seat with the basin on the seat with my fear on either side.  Basin still has soapy water from washing hair.

I now use soap and face cloth to wash body starting from top to bottom.  

I end with washing feet in the basin one by one and using warm water from squeeze bottle.


I pour the dirty water from the basin in my waste water tank. Above is my waste water tank with funnel in it.  It's a large detergent bottle.

I'm done!  It takes about 1/2 hour.


It takes about a quart of water.

I have tried different times of day to wash and wet shave.  I've gotten to the point that it works best in the early evening after dinner.  This works best for me as the Prius is warm from the day and I may not have to run the engine.  It also works as I often hike and I'm cleaner before getting into the bed sheet.

As I stated I wet shave sitting in the back seat too.

I want you to know that I'm 6' tall and I can doubt his easily and it can be done totally without getting out of the car.  It is doable when stealthing as long as you are cautious about not moving fast in the Prius.

On my Travels this year I washed up like this in the Prius 6 days a week and it didn't bother me.

I saved significantly over going to truck stops for showers every couple days at $12.00 per shower.  I tried washing like this for about 3 weeks without a shower without problems.

Brent

macaloney@hotmail.com


Tuesday, May 17, 2016

Screens For Living In Your Prius


I was recently asked about my Prius Screen design.

I figured it would be worth while going through the design detail here in my blog.

My design criteria is to have screens but don't make them real obvious.  They needed to be easily stored.  They needed to be installed from the inside, and they needed to be something I can easily put up and take down.  I also had to be able to get in and out of the car without having to fuss with the screen.

After a lot of looking and pondering designs I decided to use thin-walled fluted plastic sheets.  Some refer to it as corrugated plastic.  This is the material a lot of stick in the ground signs use. 

http://m.homedepot.com/p/24-in-x-36-in-Twinwall-Plastic-Sheet-COR-2436/202090128

I decided on making two screens, both for the rear windows so I get cross ventilation in the sleeping area.

I first cut cardboard to make a template of the window opening.  I then transferred the shape to the plastic sheet.  It only takes one pattern as either side is a mirror image of the other.


Then I decided the size of the opening in the plastic.  I cut the opening in the center of the window.

This gave me a frame for my screen and an insert I could pop back in.

I painted the outside of the plastic sheet with cutout in so the outside would be black to match the tinted windows.

I sprayed adhesive to the outside of the sheet on top of black paint. But only the outside and not the center I cut out.


I applied no see um screen I bought on Amazon and stretched the screen to glue screen on tight.

I cut the screen to the outside edge of the plastic

I added an extra layer of plastic to the top inside edge that is narrow as it needed support.


Insert unit into window frame opening.  

This picture shows the screen with center insert in.


Open window and remove center panel and this is what it looks like without my curtains in place.


I can leave the window cracked and the vent shade allows air flow but no bugs.

From the inside see first picture of this blog.

Brent

macaloney@hotmail.com